
Initializing The Raspberry Pi
Before we start working on the projects, we need to initialize the Raspberry Pi by setting up Node.js.
Updated 2021-06-18: Added information on headless installation and Raspberry Pi Zero W (can’t use remote VS Code, and you may not want to install a desktop).
Prepare The Hardware
Before you begin, let’s get some stuff ready. You need:
- Computers
- Raspberry Pi
- This article was originally written for Raspberry Pi 4B (4GB).
- I have updated this article to include the Raspberry Pi Zero W.
- Computer
- A computer to download the O/S and write to the Micro SD memory card.
- It could be Windows or Mac computer, but it could also be another Raspberry Pi.
- I am going to refer to this as the “Main Computer.”
- Raspberry Pi
- MicroSD memory card
- Minimum 8GB
- Recommended 16GB
- HDMI monitor, USB keyboard and mouse
- These devices help during the setup making things easier.
- They are not required because you could use a “headless installation.”
- They are not needed after properly configuring SSH and VNC.
Initialize The SD Card
- Get the Raspberry Pi Imager
- Windows or Mac:
- Go to https://www.raspberrypi.org/software and download and install the Raspberry Pi Imager for your operating system.
- Raspberry Pi:
- Type
sudo apt install rpi-imagerin the terminal window.
- Type
- Windows or Mac:
- Open the Raspberry Pi Imager
-
Following the screens, choose the Raspberry Pi OS.
- Do you need a desktop (graphical environment)?
- Sometimes, you don’t need a desktop and could save on some resources, especially on smaller devices like the Raspberry Pi Zero W.
- You can control the device via the terminal (command line) or remotely using SSH.
- With desktop: Select the default “Raspberry Pi OS (32-bit).”
- Without desktop: Select “Raspberry Pi OS Lite (32-bit).”.
- Do you need a desktop (graphical environment)?
- Setup advanced options
- Press ⌘⇧X (on a Mac) or CRTL+SHIFT+X (on windows or Raspberry Pi)
- Hostname
- Make sure this is unique in case you have multiple Raspberry Pi devices
- SSH
- Enable SSH and set the password authentication
- Wi-Fi
- Type the SSID and password for the network you want your Raspberry Pi to use
- Some Raspberry Pi devices, like the Zero W, do not support 5GHz channels.
- If you are planning on creating a web server that can be accessed publically, and you have several routers at your location, make sure you select the Wi-Fi provided by your internet provider so you can access your Raspberry Pi from outside your network without having to make too many changes to the internal routers ;-)
- The law requires you to select the country where the Wi-Fi device operates because it controls the radio frequencies used. Find your country and read this to understand why it’s required.
- Locale settings
- Select the timezone and keyboard
- Click
Save
- Select the storage based on the SD card you have available.
- On the Raspberry Pi, you must connect another SD card via a USB adaptor because you can’t format it’s own hard drive ;-)
- Finally, click
Write- Follow the prompts and enter a password if asked.
- Wait, wait and keep waiting
- Once done, did I say you would need to wait, close the window.
Headless Installation
Although it’s not required, I highly recommend connecting a keyboard, mouse and HDMI monitor to the Raspberry Pi device for the first time it boots up. That way, you can keep an eye on the process and ensure everything goes smoothly. The first boot may take some time. How do you know if everything is going well if you can’t see with a monitor or interact with it using a keyboard/mouse?
If you prefer not to or can’t connect those input/output devices, you could configure the boot to work on a “headless mode.”
Configuring the headless mode is pretty straightforward. You may not need to do anything if you configure the SD card using the advanced options describe above. Check out the file named firstrun.sh, which should include these lines:
systemctl enable ssh
cat >/etc/wpa_supplicant/wpa_supplicant.conf <<WPAEOF
country=CA
ctrl_interface=DIR=/var/run/wpa_supplicant GROUP=netdev
ap_scan=1

update_config=1
network={
	ssid="<Wi-Fi SSID HERE>"
	psk="<PASSWORD HERE>"
}

WPAEOF
echo "America/Toronto" >/etc/timezone
What can you do if you did not configure the advanced settings on the SD card? Or you need to change a setting after the initial boot? Easy, reinsert the SD card and configure some additional files.
- To enable SSH, you need to create an empty file named
sshon the root of the boot folder. -
Configuring Wi-Fi is a bit more complex because you not only need to indicate that you want to use Wi-Fi, but you need to specify the country, network and password. To do so, follow these instructions:
- On the root of the SD Card, create a file named
wpa_supplicant.confwith the following content:
country=<COUNTRY_CODE> ctrl_interface=DIR=/var/run/wpa_supplicant GROUP=netdev update_config=1 network={ scan_ssid=1 key_mgmt=WPA-PSK ssid="<Wi-Fi SSID HERE>" psk="<PASSWORD HERE>" } - On the root of the SD Card, create a file named
Initialize The Raspberry Pi
- Insert the Micro SD card in the Raspberry Pi
- Connect the HDMI monitor, mouse and keyboard
- I highly recommended this. At least it would help if you connect an HDMI monitor.
- You can always connect to the Raspberry Pi via SSH and VNC (if you installed the desktop), but it’s good to keep an eye on the boot.
- Turn on the device and follow the screens menus
- If you have configured the desktop version, you may be prompted to set up the location, password, screen, Wi-Fi, and perform software updates.
- Find the IP Address
- If you installed the desktop, open up the terminal window first.
- Type
hostname -Ito find the Raspberry Pi’s IP address in your local network. - Alternative ways to find the IP Address
- If your “main computer” is on the same router as the Raspberry Pi, you can use this command
ping <RaspberryPiName>.localto find the device’s IP address. - You can use your Wi-Fi’s web page (if it has one) and find the IP address that has been provided dynamically or assign a fixed IP address.
- If your “main computer” is on the same router as the Raspberry Pi, you can use this command
SSH and VNC Validation
You can use an SSH client (command line terminal) and a VNC client (if you use a desktop) to connect your main computer to the Raspberry Pi using the IP address or the hostname. After completing the VNC setup, you may disconnect the monitor, keyboard and mouse.
You can use this command ssh pi@<IPAddress> or ssh pi@RPIName.local from the “main computer” to open SSH.
- If you get this response
ssh: connect to host rpiZero.local port 22: Connection refused, it just hangs, or you do not see any output yet the Raspberry Pi may still be booting. It could take few minutes to boot, especially the first time. (that’s where an HDMI monitor helps).
The first time you connect, you will see a prompt to accept the authenticity of the host. If you trust it, type yes. Once you accept the request, the device is recognized, and you will not be prompted again. Then you need to enter the device’s password, and you can start interacting via the terminal with the device. When you finish, type exit to terminate the SSH session.
Once you are in an SSH session, it’s a good idea to update the software installed. For that, you can try these commands:
# Refreshes repository index
sudo apt update

# Upgrades all upgradable packages
sudo apt upgrade

# Upgrades packages with auto-handling of dependencies
sudo apt full-upgrade
If you installed a version of the OS with a desktop, you might want to configure VNC, but first, ensure SSH is completely setup, and you have tested it. Then, enter this command sudo raspi-config while in an SSH session. Then, navigate the menus, and go to Interfaces > VNC and enable it. Once this is complete, you can use a VNC terminal to connect to the Raspberry Pi.
Configure Node.js
NOTE: Node.js versions 12 and later no longer support ARM6! But you can still install Node.js on those versions.
Raspberry Pi uses different instruction sets for their chips, ranging from ARMv6 to ARMv8. Unfortunately, Node.js version 12 stopped the support for ARMv6. If you are working with a chip that uses an older instruction set, you can still use Node.js, but the installation steps may differ.
| Instruction Set | Raspberry Pi | Node.js |
|---|---|---|
| ARM8 | RPi 4, RPi 3, RPi 2 Model B v1.2 | Current LTS version v14.17 |
| ARM7 | RPi 2 Model B | Current LTS version v14.17 |
| ARM6 | RPI Zero, RPI (v1) | Official support up to version 11.15 or you could use the LTS unoficial version v14.17 |
Today (June 19, 2021), the LTS (Long Term Support) version of Node.js is 14.17.
Please visit the article on Raspberry Pi Families And Models for additional information and details on the chips
ARM6 (Raspberry Pi Zero W)
If you are installing Node.js on a Raspberry Pi Zero W, you have two options. First, Install an old version of node.js version 11.15, but there could be features that you need which are not available on that particular version. Second, you can install an unofficial version of Node.js version v14.17, but since this is not official, it’s not supported, and there could be things that do not work. There are no guarantees that it works (it’s not an official release), but I am using that version, and it works great for me!
How to install an unofficial version of Node.js?
- Go to the Unoffical builds download page
- Choose the folder for the version you want to install and select the file with extension
.xz- I am using LTS version (v14.17.0) and I downloaded this file node-v14.17.0-linux-armv6l.tar.xz.
mkdir work
cd work
mkdir Node.js
cd Node.js
wget https://unofficial-builds.nodejs.org/download/release/v14.17.0/node-v14.17.0-linux-armv6l.tar.xz
- After downloading the file, you need to execute this command
tar xvfJ node-v14.17.0-linux-armv6l.tar.xzto extract it. - Use this command
sudo cp -R node-v14.17.0-linux-armv6l/* /usr/localto copy the code to the right path. - [Optional] you may want to delete the file downloaded and the folder created.
rm -rf node-v14.17.0-linux-armv6l
rm node-v14.17.0-linux-armv6l.tar.xz
- Type this command
sudo rebootto reboot the Raspberry Pi.- You may also want to use
sudo shutdown -h nowif you want to shut it down.
- You may also want to use
ARM8 (Newer devices)
- You need to log in as root, so type this
sudo suto do so. - Download Node.js
curl -fsSL https://deb.nodesource.com/setup_current.x | bash - - Install it
apt install -y nodejs. - Type this command
sudo rebootto reboot the Raspberry Pi.- You may also want to use
sudo shutdown -h nowif you want to shut it down.
- You may also want to use
Test the installation
Let’s create a folder for the work in the terminal window.
- Ensure you are in the home directory
cd ~/ - Make the folder
mkdir work - Navigate to it
cd work
Let’s ensure we have Node.js running correctly.
- Create a new folder
mkdir tests - Change to it
cd tests - Write a simple Node.js code
echo "console.log('Hello Node.js');" > test01.js - Run it
node test01.js
You should see Hello Node.js on the screen.
Configure a Node.js Web Server
What about a web server? Great question! I am glad you asked. Let’s copy this code in a file named test02.js. You may want to use nano test02.js or any other text editor.
const http = require("http");
const server = http.createServer((req, res) => {
  res.writeHead(200, { "Content-Type": "text/html" });
  res.write(`<h1>Hello Node.js</h1>${new Date()}<br/>`);
  res.end(`${new Date().toJSON()}`);
});
server.listen(3000, "127.0.0.1");
console.log("Web server is running…");
After saving the file, run it by typing this command: node test02.js. You should see Web server is running… in the terminal, but how can you test it? Well, it depends if you have a desktop or not.
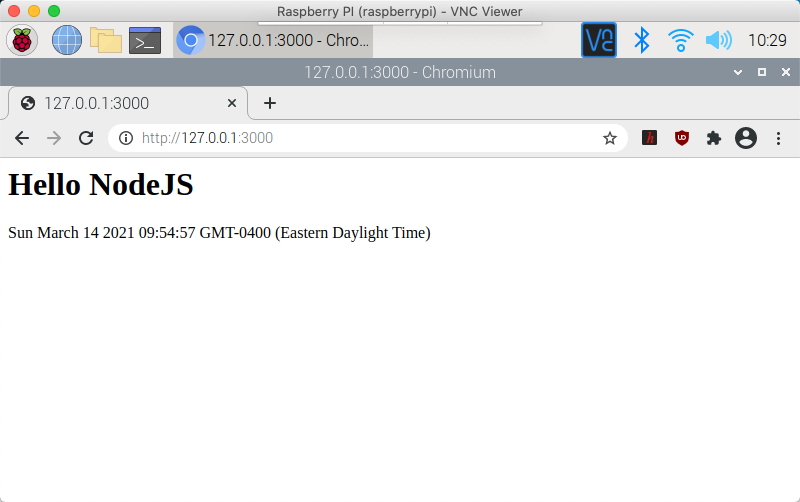
With Desktop: Open up the chromium web browser and go to this address: http://localhost:3000.
Without Desktop: Open a new terminal (or a new SSH session) and type curl http://localhost:3000 to fetch the page.
In either case, you should see the Hello Node.js page with your current time.
At this point, we can browse the Node.js web server from the same device (Raspberry Pi) but not from your main computer, even though they are in the same network. Let’s fix that by installing NGINX
It’s always a good idea to update your Raspberry Pi before installing any software, so in the terminal window, type these commands:
# Refreshes repository index
sudo apt update

# Upgrades all upgradable packages
sudo apt upgrade

# Upgrades packages with auto-handling of dependencies
sudo apt full-upgrade
Let’s install NGINX using this command: sudo apt install nginx and follow the prompts.
At this point, we can open a browser on our main computer and browse to the IP address we found earlier (hostname -I). You should see a page with this message: Welcome to nginx!
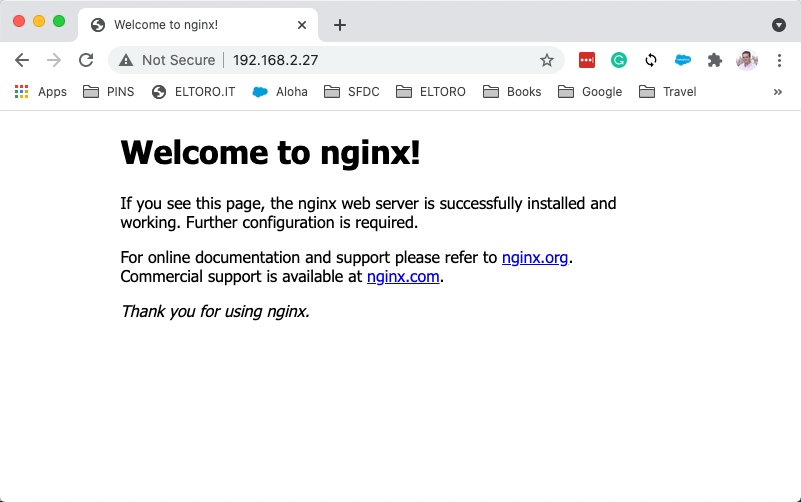
But this is not our Node.js server, so let’s configure NGINX.
- Change to the directory where NGINX stores the configuration settings
cd /etc/nginx/sites-available/ - Make a backup of the current settings
sudo mv default default.bak - Open a text editor with the config file
sudo nano default
Copy this code into that file (that’s why we did a backup):
server {
    listen 80;
    server_name localhost;

    location / {
        proxy_pass http://localhost:3000;
        proxy_http_version 1.1;
        proxy_set_header Upgrade $http_upgrade;
        proxy_set_header Connection 'upgrade';
        proxy_set_header Host $host;
        proxy_cache_bypass $http_upgrade;
    }
}
- Ensure the new file’s content is precisely the lines above, nothing more, nothing less. Type this command:
cat default - Restart NGINX by using this command
sudo service nginx restart. - If you had stopped the Node.js web server, restart it with this command:
node test02.js. Ensure you are on the folder where you saved that file (cd /home/pi/work/tests). - You can now open a web browser on your main computer and browse the Raspberry Pi’s IP address (or hostname).
- If you configure your Modem (port redirect), you could expose your Raspberry Pi as a web server to the world.
Configure VS Code Remote Development
VS Code does not run on slow devices, like the Raspberry Pi Zero W.
On your main computer, open VS Code and add these two extensions:
- Remote - SSH
- Remote - SSH: Editing Configuration Files
Open the command palette and type >Remote-SSH: Connect Current Window to Host… enter the IP address for your Raspberry Pi and the password if asked.
You can now use the Raspberry Pi from VS Code as if this was your main computer. For example, if you open files or save them, they are written to the Raspberry Pi. If you open the terminal window, it’s your Raspberry Pi…!
References
- Headless Raspberry Pi 4 Remote Desktop Vnc Setup (Mac + Windows, 13 Steps)
- headless Raspberry Pi setup
- Install NodeJS on a Raspberry Pi Zero
- Visual Studio Code Remote Development over SSH to a Raspberry Pi is butter
- Install Node.js
Support me with a small contribution by Paypal or, if you prefer, buy me a coffee.
Please leave a comment
Comments are powered by Utterances. A GitHub account is required to comment. Comments are moderated. Be respectful. No swearing or inflammatory language. No spam.
I reserve the right to delete any inappropriate comments. All comments for all pages can be viewed and searched online here.
Opinions expressed in this blog are solely my own and do not express the views or opinions of my employer, wife, son, friends, boss, or anybody else! 😀
To edit or delete your comment: