
Hello IoT (RPIO)
We are now ready to start with a few simple circuits and finish setting up the Raspberry Pi.
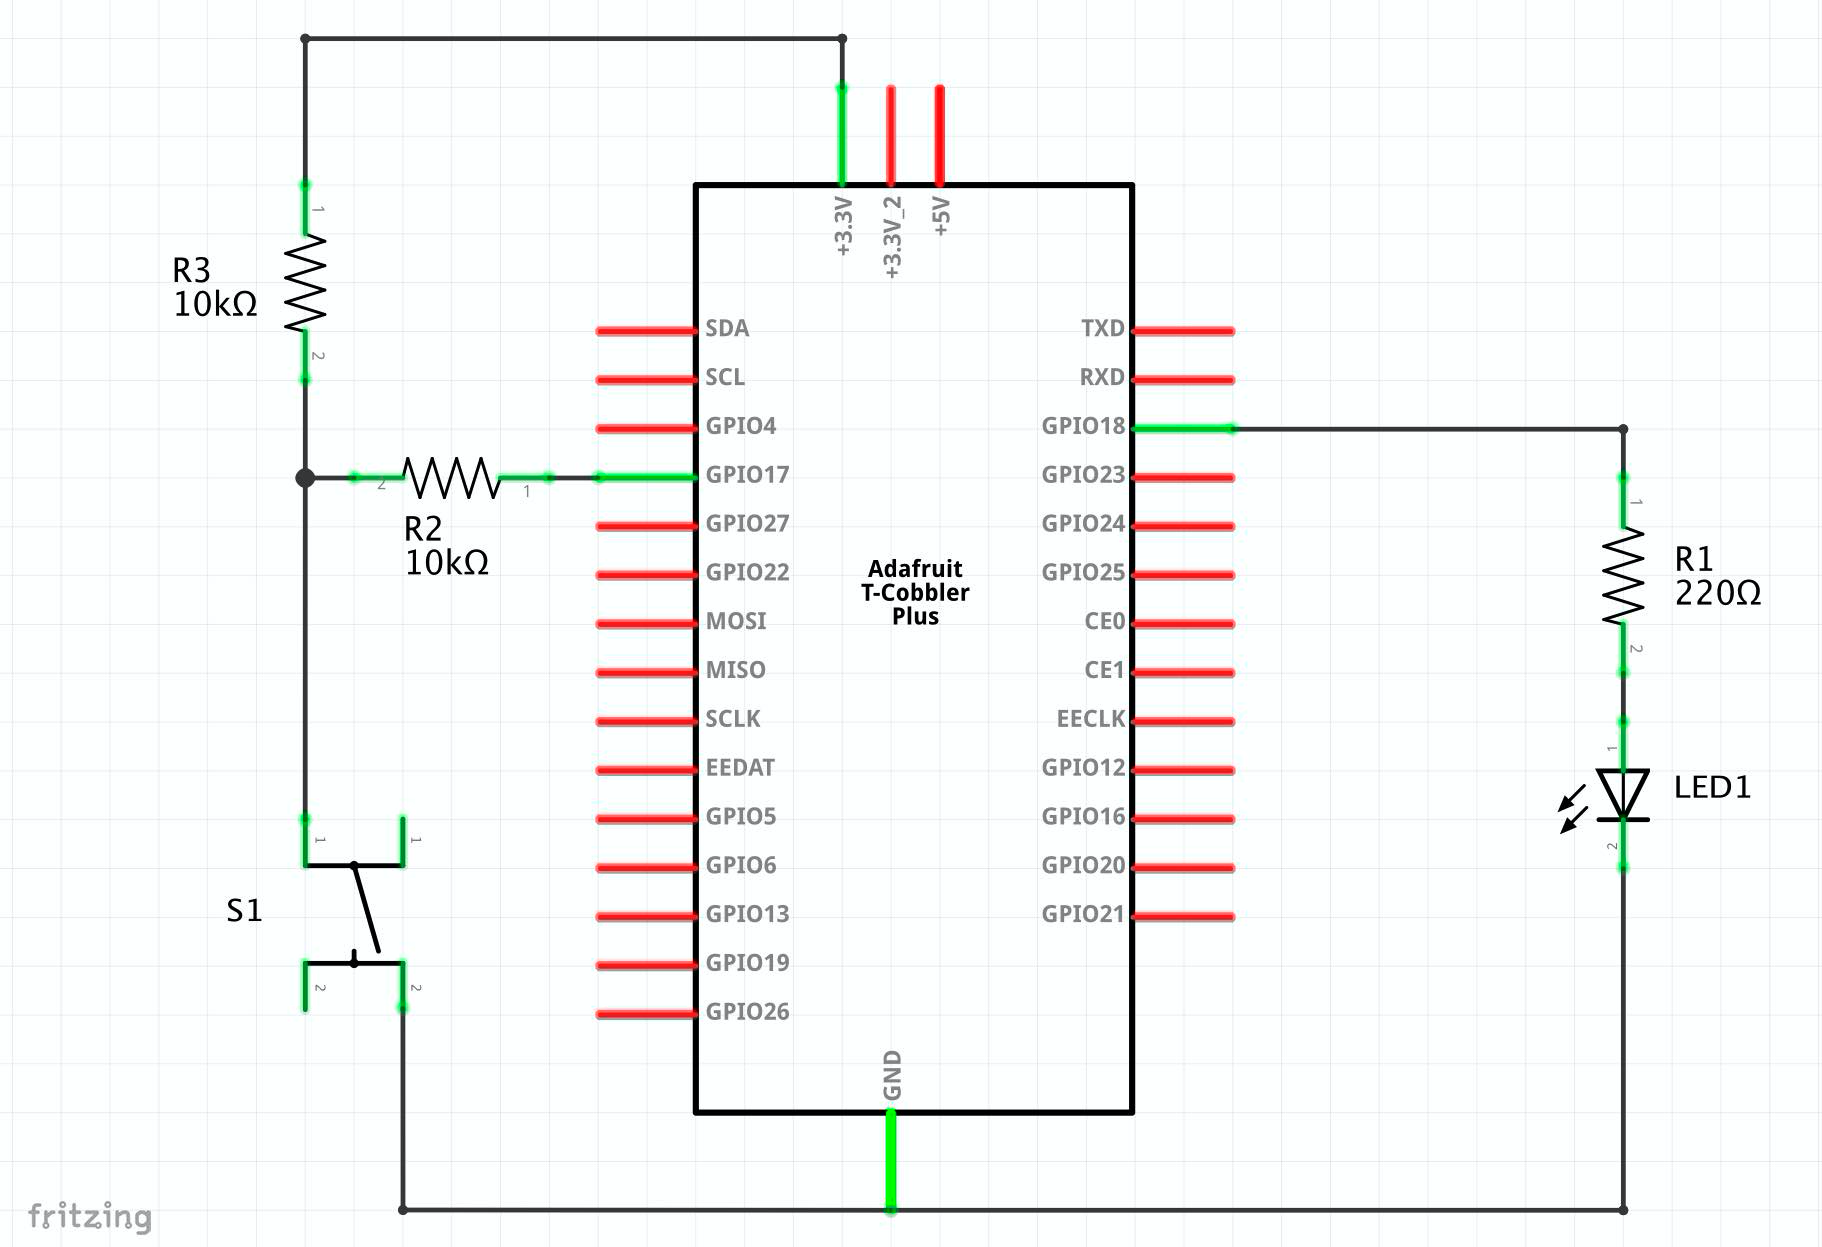
We are all familiar with the “Hello World” samples in tutorials, so let’s keep that tradition and build the Hello IoT circuit. But first, let’s see the schematic diagram of what we are building:
Rather than describing the functionality of the project we are building, let’s watch it in action because a picture is worth a thousand words, and an animated GIF is worth a thousand pictures.
To be clear, this is how the project works:
- When you press the button, the switch S1 closes, and the voltage goes down to 0 Volts.
- When the button is released, the switch S1 opens, and the voltage goes back to VCC (3.3 volts)
- The Node.js code detects the switch is released, and it changes the state of the LED (LED1) from OFF to ON or vice-versa.
Notice this is different than having the LED light only while pressing down the button! (this is important, and explained below)
The Node.js code
These are the steps to get the circuit working:
-
Create a folder in your Raspberry Pi named “Samples” by following these steps
cd ~/workmkdir Samples
- On your main computer, open VS Code and connect it to your Raspberry Pi.
- Open the Samples folder created in the previous step.
-
Open the terminal window.
You should see
pi@raspberrypi:~/work/Samples, VS Code is working on a folder named Samples in the Raspberry Pi! - Initialize the folder with these commands
npm init -ygit init
Using The RPIO Library
For today’s blog, we are going to use the RPIO library. In a future article (Hello IoT (PIGPIO)), we are building the same project using PIGPIO and comparing the differences.
Please follow these steps to get the RPIO library ready:
- Configure the RPIO npm package by using this command
npm install rpio - Let’s add the node_modules folder to .gitignore
echo "node_modules" > .gitignore - Create a file named
S01_LedButton_RPIO.jswith this code:
Open the terminal panel, and type node S01_LedButton_RPIO.js. When the button gets pressed, the LED changes state from OFF to ON. If you press the button again, the state changes back to OFF.
If you prefer, you can run the debugger like this node inspect S01_LedButton_RPIO.js and use VS Code to debug the code.
So, what does this code do?
1Imports the RPIO library-
2Imports the perf_hooks.performance standard library, which implements a nice timer with a resolution in milliseconds, similar to the Window.performance found in browsers.As a software developer, if I need the event loop in JavaScript** to wait for a little bit, I may use 1/2 a second because that is not much time. Well, in electronics, that is an eternity!
4 - 5Defines shortcuts for the HIGH/LOW values using the definitions in the RPIO library.-
7 - 8Define the pins used for the LED and the button.View this article GPIO Pins to understand why we are using pins 11 and 12 rather than GPIO17 and GPIO18.
-
12 - 14Initializes the buttons to indicate the LED is output and the button is input. We also tell the button to use a pull-up resistor (rather than a pull-down - resistor).View this article Pull-Up, Pull-Down Resistors if you want to understand the difference between a pull-up and a pull-down resistor.
16 - 22Flips the output from a LOW to a HIGH or vice-versa, turning ON/OFF the LED.24 - 40The main application… Read below for an explanation of how this function works.41Invokes the main application
Let’s talk about the function that makes everything happen (lines 24 - 40)
25Defines the original state for the LED (off).26Initializes the timer with the current time.-
28Defines the length of time (500ms) that the button must be pressed before reacting.View this article Debouncing A Button to understand why we have to do this.
30 - 39We are building a handler for the poll event on the button pin, asking RPIO to inform us when the button is released.31Get the value of the timer when the button is released.32Checks to see if we should be acting on the information received35Flip the state of the LED (in memory)36Assign the value to the LED, changing the state of the LED (turns it ON or OFF).38Store the current time.39RPIO allows us to specify when we want the notifications about the event. In this case, it’s notifying us when the button releases rather than when the button gets pressed.
Support me with a small contribution by Paypal or, if you prefer, buy me a coffee.
Please leave a comment
Comments are powered by Utterances. A GitHub account is required to comment. Comments are moderated. Be respectful. No swearing or inflammatory language. No spam.
I reserve the right to delete any inappropriate comments. All comments for all pages can be viewed and searched online here.
Opinions expressed in this blog are solely my own and do not express the views or opinions of my employer, wife, son, friends, boss, or anybody else! 😀
To edit or delete your comment: